Little hat, cont.
Despite a doctoral recital this past weekend, and decent progress on the Top Secret gift projects, I managed to get some work done on Daniel's hat:
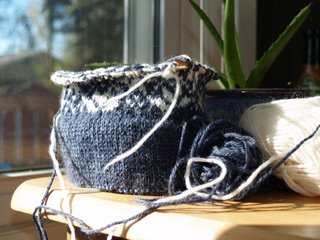
I had originally intended to shape the top like any other hat, with regular decreases to make it round like the head of the intended wearer. However, by the time I'm done with the color design, there might be too much hat for that, and it would look a little goofy. Perhaps I should have done a smaller hem? Should I rip it out and start over? Nope, I've got a better idea: Do the whole thing in an un-shaped tube and then do a three-needle bind-off across the top so it looks like a flat seam, stick a couple tassles in the corners and voila! Another design a little too cute for an adult but mighty cute on a babe.
Unfortunately, when I set it on my son's head, it looks like it might be a little small. The stockinette hem and two-color pattern probably won't stretch as well as ribbing would, so this hat may be gifted to a younger baby in a cold climate. I'm not enough of a perfectionist to frog a hat if there aren't mistakes in the actual knitting. Not to worry. I have plenty of hat-appropriate yarn in the stash to try something else for my little boy, and in the meantime he does have hats, just not any extra-warm ones.


Comments
Who knows - maybe after washing and blocking it'll fit the wee one just fine!